
My manicure routine
My routine manicure would be once a week. I Like to prepare everything I will need so I can totally relax and focus on my mani. Music, cup of coffee, there I go.

Filing
The trimming and shaping of the nail is best to take place with the polish still on it so you can't be fooled by uneven nail lines but you will just look at the contours of your nails. I never clip unless one nail breaks, then I clip down everything to my nail line (So I can stylishly wear my vampy polishes without looking like a witch lol)
When I file to trim, I use my Konad file because it does the job quick. After I retained my desired length, I use my Sephora glass file to shape the contours. I like to try to get my nails squoval wich to me is a feminine, classy shape. To decide your own perfect shape you can try to mimic the shape of your cuticles on the bottem of your nail bed. This is supposedly the most flattering style.
After I shaped my nails, I finish off by running along the edges I just filed with a 3 way buffing file, to take a way debris and smooth the edges. I do not buff my actual nail plates, unless I have some serious ridges going on.
After all off this has been taken care off, I remove my polish. I use cellulose pads because they are not fluffy, but I can't stand the touch, they remind me of chalkboards and squeeky crayons EEWWWWW! I still have to find a good alternative... I like to use a aceton free remover for swatching, but for my actual manicure I use aceton remover so my nail plates are more dry and therefor improve the adhesive power of my polish.
Soaking
I choose not to soak my hands because nails have the tendency to absorb moisture so your polish would not stick properly to your nailplate. If you're not going to polish, it is recomended to soak the hands as the cuticles would soften. In the warm water you could add a few drops of soap or bath oil (normal oil will float on the water) After about 5 minutes you can remove your hands from the bowl and gently pat them with a dry towel.
Cuticles
Now it's time for your cuticles. First I like to exfoliate my cuticles with an emeryboard. This immidiately takes away hard, dead skin and prevents hangnails.
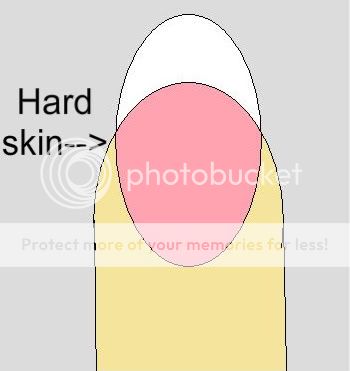
Pull back the skin around your nail and gently file with your emeryboard. Make sure you dont touch the actual nail. I like to concentrate on the corner of the nail/cuticle as here a lot of dead skin build up.
Now you could apply some cuticle remover to remove left over dead cells and to free the cuticlle from the nailbed. Cuticle remover is a product that contains ingredients such as Alpha-Hydroxy-Acid or Potassium Hydroxide and has a very high PH between 10-13 (The skins natural PH is around 7) so it is able to dissolve tissue. You can now GENTLY push back you cuticles with either an orange stick or your finger nails.
Make sure that you neutralize the effect of the cuticle remover by washing your hands with water and soap.
Scrubbing
The skin on my hands has the tendancy to mimic the skin of alligators. For real. My foolproof cure is my 1 minute manicure in a bottle, a oil/sugar based scrub. I like the one from Sephora as it contains many natural ingredients such as olive and sweet almond oil and it smells great, but I guess you can use any brand. Just make sure you shake the bottle well and pour a table spoon of the product on DRY hands. Then scrub your hands as if you were washing them. I like to pay extra attention to my knockles and thums. It is normal that this procedure does not feel all that pleasant but it shouldn't hurt. After about 1 minute you can wash off the scrub and that gives you the best feeling.... Ahhhhhh.... relief! Now I use a soap to rins off any oily residue and pat dry my hands.
Maintainance
Wind and water are causing dehydration so make sure you wear gloves when you do house keeping chores or go out in cold weather.
Also, use a good hand cream. When you go outside, make sure it contains a good SPF to prevent sun damage (wrinkles/age spots...) Chanel carries a good one. For the night, you can use a more rich product without a SPF. I am totally hooked on Kenzoki sensual hands balm, it is very rich and full, yet not too greasy. The fragrance is unbelievebly delicious: delicate rice steam.
Every week after applying my nail polish I drown my cuticles in cuticle cream, slather on handcream and slide my hands in Bliss Glamour Gloves. These gloves are lined with a natural, jelly like substance that slowely release their benificial ingrediants such as grapeseed and avocado oils. It completely coveres your hands so the skin will warm op and the pores will open to absorb all the goodies in your cream. This is very luxurious and will make you feel like you don't need no salon, ever!
I use a cuticle product as often as possible, for sure every night, but also in the morning or at work. I prefer creams over oils and I have been using Dior Creme Apricot for about a year now and am pleased with the results.
Polishing
PreparingChoose your workplace, I like to work on a table with a bendable lamp. I use a placemat to protect the surface of my table. Put all the products you need in front of you. I know this might be obvious, but believe me how many times I was in a hurry and scr*wed up my fresh polish by reaching for the topcoat...
Make sure your nails are oil free (wipe them with remover) and your cuticles are pushed back.
Products you might need
*nail polish remover
*cottons or pads
*Q tips or small brush ( real hairs, no plastic as this might melt in aceton!)
*base coat or ridge filler
*your nail polish of choise
*topcoat
*you might want to use fast drying drops
Base coat
There are several reasons why you would use a base coat: it protects the nail from stains and discolorations, it provides the right grip for your polish, it makes applying your polish more smooth.
You can use clear base coat, tinted ones, or a special sticky base coat. Most nail hardeners are also suitable to use as a base. Be aware with highly pigmented polishes: to be sure they won't stain your nails, you can put two layers of base coat for maximum protection.
Ridgefiller is a base coat that contains small particles like nylonpowders to fill ridges and smooth out the nail plate surface. A ridgefiller typically dries to a matte finish and most have a milky white hue. If you don't have a matte topcoat but you would like to achieve a matte look for your polish, you could apply a ridgefiller instead of a topcoat. Be aware of the milky finish, so it would effect the color of your nailpolish!
Another tip: If you want to apply neons, pastels or any light color, starting off with 2 layers of ridgefillers as a base helps you to achieve a blanc canvas on wich the actual polish stands out more.
Polishing
I am also still in the process of experimenting how to achieve perfect polished nails. Let me share with you what I found out so far.
You will have to mix the formula of your polish but try not to tempt yourself to shake the bottle. (if you do, let the bottle rest standing up for about 5 minutes to allow bubbles to surface) It works just fine to either roll your bottle on a flat surface, or gently swing the bottle in your hand. This way you won't get bubbles.
Now you open your bottle and thover the brush above the opening, allowing the exess polish to drip back into the bottle. It's ok if you feel like you need to scare the exess off on the bottles neck but I like to start with a bead of polish.
Now you either detect the wide side of your polish brush (OPI pro wide) or you just go ahead and place your brush right in the lower middle of your nail. If you work with a bead like me, then push the bead from below the middle, towards the cuticle. Make sure you stop right before the cuticle, you want to keep a small empty line between cuticle and polish. Then you finish the fist stroke, from the cuticle upwards towards the free end of the nail. Only one brief stroke. Then you take your brush again * no need to reload* and place it right next to your initial stroke just above the cuticle. Now you would want to make a nice, neat stroke on both sides of your initial stroke Two strokes should do, with the OPI brush 1-2 strokes!
Make sure your first layer is not too thick.
I wait about 2 minutes before applying the next layer because if the first layer is still too wet, it tends to drag and damage. I apply 2-4 layers of polish, depending of the formula, pigmentation and effect.
Topcoat
A topcoat protects you nail polish from damaging and discolouring, it adds shine and in some cases helps drying your polish. Some polish colors are effected by topcoats, they might deepen a shade or become more vibrant. I think this could be a good thing for dull/old polishes, just go head and experience!
If you used a matte polish, you should be aware that using a regular topcoat would totally effect the matteness.
There are also matte top coats available, I use China Glaze matte magic and it does the job. I don't like the feeling of the matte finish though, reminds me of chalkboard...
I love the fast drying topcoat Seche Vite, I use it all the time and can't remember how my days where before I discovered it. I mean *bed sheet imprints* and the dreaded *2 hour waiting before my polish would dry*
How to apply: you apply your polish regurlaly, no need to dry, after you polished your 10th nail you can start applying Seche Vite to nail 1. Allow the brush to collect a generous bead of Seche. Place the bead on your nail and *glide* the bead to cover your polish. Make sure the brush doens't touch your nail, always let it hover in the bead of product. If it does touch your nail, your polish is most likely to drag and damage. I like to be generous with my Seche Vite, it gives the prettiest glossy vinyl like finish and makes my mani last for ever. No chips, just some tipware.
I have heard complaints about Seche Vite would mysterically shrink polish, but so far I have never experienced this. There is just one thing about it that freakes me out; the warning on the bottle that the product is known to cause birth defects. Kinda scary huh!? But yeah, it cuts down the drying time of my mani to 10 frigging minutes, isn't that amazing?
Tip: Some people like to add a fresh layer of topcoat daily or every other day to make their mani last longer.
Cleanup
After polishing you can do a cleanup. I don't know anybody that can perfectly polish 10 nails. I can't, however I still hope that one day I could... you can use a natural hair (make-up or painters) brush that you dip in pure aceton. I learned this from the wonderfull blog littlemusicboxes, written by Megan. Check out her blog as it's full of tutorials and beautiful polish pics.
Removing nail polish
Basic polish removing
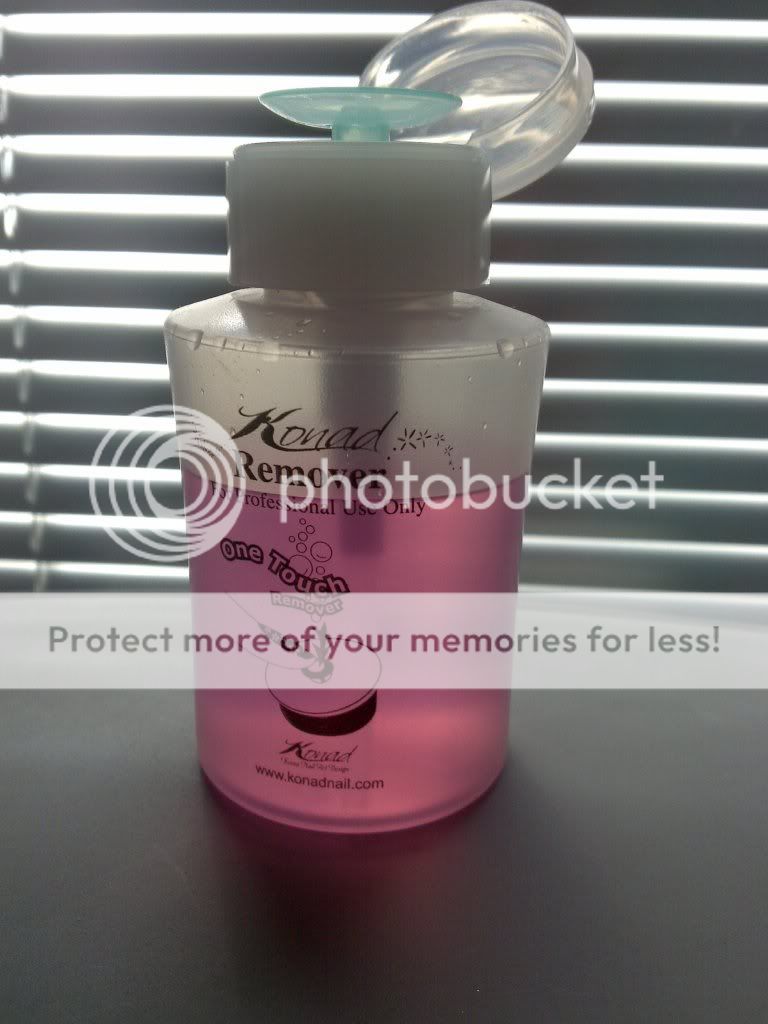
For the everyday nailpolish I like to use a acetone free remover. I like the idea that it contains less toxic ingredients. I bought an empty 1 push remover bottle by Konad that I fill with any drugstore cheap remover. This bottle comes in totally handy because you don't have to screw open anything, you just push the lil thingy and weppa there you have a fresh nice squeez of remover.
For a basic removal of polis, I would moist my cellulose pad with a good amount of remover, place it on my nail and let it work for about 15 seconds. Then I move my pad upwards towards my free nail edge. Try not to rub in this stage! If you do, the pigments might travel their way underneath or on your cuticles and this could leave residue for days. Not pretty. Therefor I use 1 pad per finger. When I finished removing the polish from all nails, I take 1 clean pad with remover and quickly run over all nails to finish off.
Now I would wash my hands and if I want to apply fresh nail polish, I would take my acetone remover and a new pad and run it over every nail to ensure no oils or soap is left on the nail surface.
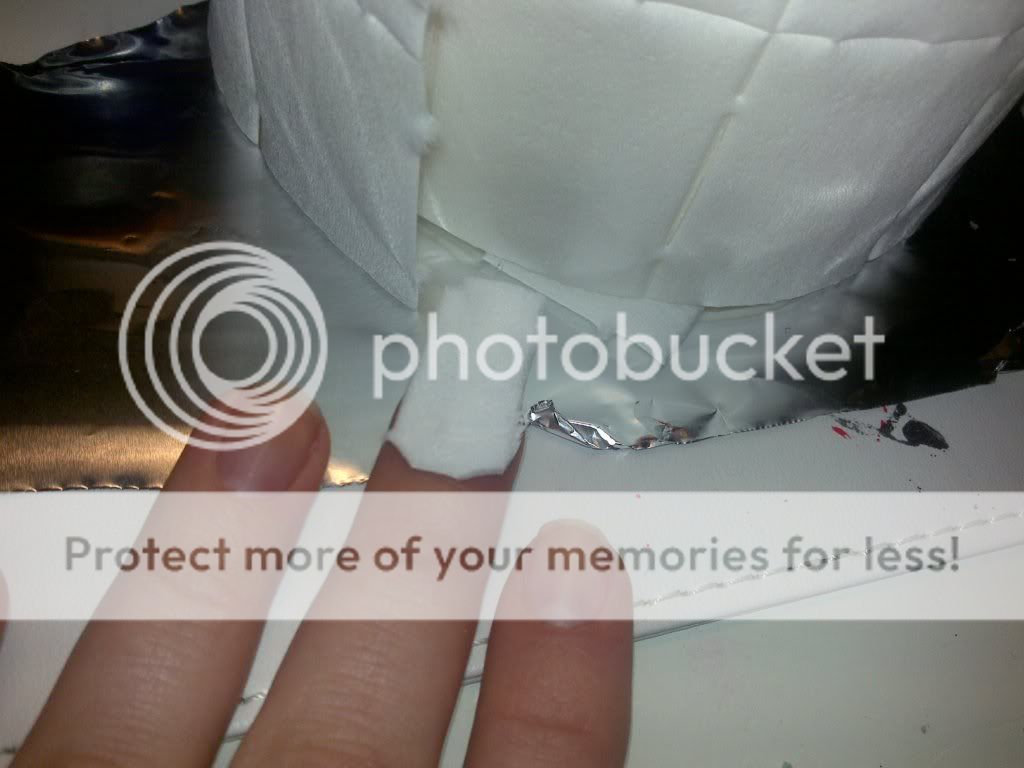
Removing glitters
Oh my, glitter polishes used to be my worst nightmare! If you try to take them off the traditional way (as described above) it might take you an hour! And glitters everywere! Days later I would find glitters on my carpet or couch... A true pain in the bum. But! There are a few ways to speed up things. I am not a doctor but I assume the aceton might not benefit your health so try at your own risk.
The pad/tinfoil way
Take a scissors and cut your cellulose pads in the shape of your nail plates. more or less.

The soaky way
Take an old glass (no plastic, acetone might melt this!) bowl and pour enough acetone in it to cover your fingertips.

I am not affiliated with any of the mentioned companies. For further information I refer you to my disclosure policy